State Machine

giphy

There are a many components required to achieve the melee/bullet-hell style of game-play that this project is focused on. From user-interface, leveling system, object pooling, game manager and etc, though none of that holds a candle to role played by the artificial intelligence. Without the artificial intelligence, there wouldn’t be much of a game. I’m going to break down the design of my stack finite state machine (FSM) to offer others some insight into my approach. Feel free to critique.

Reflex Agent

I’ve created a reflex agent for use in this project, it was the best choice for this project as most decisions made by the agent are related to the players actions. The term agent refers to the AI program or machine. A reflex agent is reactionary, changing state based on some given information.

Finite State Machine

finitestate machine (FSM) or finitestate automaton (FSA, plural: automata), finite automaton, or simply a state machine, is a mathematical model of computation. It is an abstract machine that can be in exactly one of a finite number of states at any given time. This is a wiki definition, that I believe explains it perfectly.

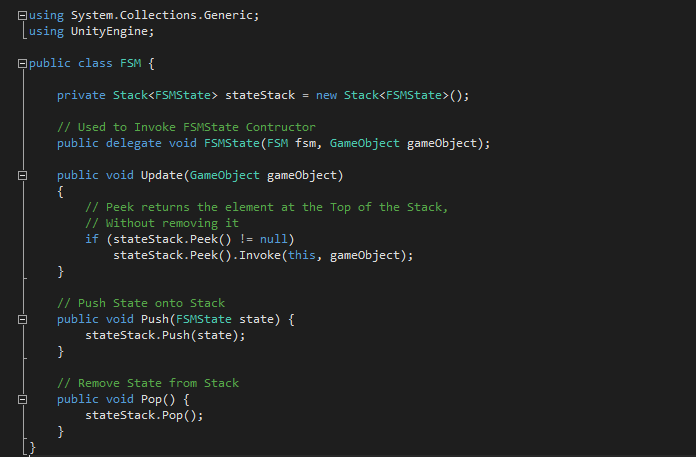
Stack Finite State Machine

Using a stack to manage a state machine has tremendous benefits, allowing for states that are more easily managed and modified. A Stack is a container adapter, representing the last-in-first-out(LIFO) non-generic collection of objects. Container adapters are classes that use an encapsulated object of a specific container class as it’s underlying container, providing a specific set of member functions to access it’s elements. Here is a little snippet of the class responsible for managing the AI stacks:

FSMSnippet

Link to video: Combat

Movement Tests

Shoot To Move vs Touch Joystick & Button

ShootToMove

Shoot to Move
After my research on mobile development suggest that I stay away from traditional game controls such as joysticks and buttons, I opted for the simple shoot to move model. This model of game-play was promising as it took users far less time to understand the controls as opposed to other methods, and it handled two game-play actions with a single gesture. This model of movement was also easy to implement, which is a plus as saving on computing power is a big deal for mobile platforms. The problem arose when users found it difficult to fire at enemies directly below or above them, as a large amount of the screen real-estate would be taken up by a single finger.

Shoot To Move Link

Touch Joystick & Button

The touch joystick & button model of game-play, is a bit more complex as I noticed players taking time to fully adjust to the controls. The joystick required quite a bit more computations as I noticed  a drop in frames once or twice already, currently still looking to make as many optimizations as possible. I made the decision to use twin-sticks early on during development as I figured it would kill two birds with one stone, though I was proven wrong after some user testing. It proved troublesome for users to use a second joystick for weapon fire as having two fingers on screen created problems where the player would find their fingers clashing for screen space as well as losing track of the joystick positions; moreover, To combat this, I stuck with a simple button instead and added a proximity based auto-aim feature that allowed the player to target enemies close by.

Touch Joystick & Button Link

Conclusion

In the end I was forced to scrap the shoot to move model as the cons out weighted the pros. The shoot to move model on mobile just isn’t suitable for 360 degree movement, and the joystick proved to be far more reliable when it came to dealing with foes approaching from numerous angles.

Unity 5.6: NavMesh

The Unity Engine has seen numerous improvements over the last couple of months and more are scheduled and on the way. Of these improvements, the one that stands out to me is there reworking of the NavMesh system.

The improvements to there NavMesh system now allow for: 

  • Multiple NavMeshs
  • Baking at run-time
  • Baking for separate agents
  • Storing NavMeshs in prefabs
  • Connecting NavMeshes
  • Orient NavMeshes

These changes greatly improve AI path finding capabilities, which I’ll be discussing in this blog. Now I’m still learning to take advantage of these new features and components, so if you desire to do some research of your own please follow this link: NavMeshComponents

Baking at Runtime

Update coming soon

Chemistry Engine

During a talk at the Game Developers Conference(GDC) in San Francisco, technical director Takuhiro Dohta discussed how Nintendo decided to break conventions by developing their very own Chemistry Engine. Dohta, went on to explain that the Chemistry engine would be a “Rule-Based State Calculator.” Essentially the Chemistry engine would simulate an objects chemical reactions to elements. Fire, water, air, earth and even electricity and wind are considered elements; moreover, Anything that does not hold a solid constant form is referred to as an element. Solid objects such as a trees, wood, rocks or etc are referred too as materials. Dohta then went on to explain three important rules of Breath of the Wilds Chemistry engine.

Rules:
    1. Elements can change a Materials State
    2. Elements can change an Elements State
    3. Materials can not change another Materials State

Given some of Takuhiro Dohta’s infinite knowledge I’ve decided to implement a Chemistry component of my own in hopes to replicate Nintendo’s Chemistry engine.

Tile Map 

TileMap

Above is the Tile Map I have created to take advantage of the Chemistry component. The Tile Map is procedural requiring no manual setup, the larger cube shape objects are called obstacles. Obstacles will implement the Chemistry component allowing for more dynamic behavior. The Tile Map also takes advantage of a Flood Fill algorithm, which is discussed in detail by Sebastian Lague on his Youtube channel. But we’ll be focusing more on the Chemistry engine component in this blog.

Class Diagram

CD Chemistry

Above is the current Class diagram of the Chemistry components. Improvements will be needed but this implementation will handle all interactions needed during game-play. At the moment I’m stuck trying to create the visual feedback necessary to convey the interactions between materials and elements.

Update coming soon

Delta Time

FPS
Frames per second (FPS) represents the amount of time an application updates per second and is important to understand when working with or developing an Engine. 

Translation Example

Units

Say we were to try and translate an object in the Unity Engine, if we moved the object 3 units per frame with varying frame rates, we can notice a drastic change in position. This change in position can directly be attributed to the rate at which the game is updating. In the example above, X1 represents a computer running at 30 fps and X2 represents a computer running at 60 fps, moreover, the relationship shared between X1 and X2 is that they both translate the player 3 units per second. In one second, X1 will have moved 90 units and X2 will have moved 180 units. This difference is due to the rate at which the Engine is updating:

XI: 3 * 30 = 90 units per second

X2: 3 * 60 = 180 units per second

The time between frames is also Not constant which can create even more varying results regarding the position of our object. When developments games, this behavior is undesirable as developers aim to develop a Universal experience. So how do we translate the player to the same position, regardless of frame rate? Well when looking for incremental change such as Translation or Rotation, is it best to rely on delta time.

What is Delta Time?
Delta time is a static variable that represents the time between each Update(), or FixedUpdate() function call. Unity’s Time.deltaTime returns the amount of time in seconds it took to render the last frame.

Delta time at 60 fps =  1/60 = 0.016 milliseconds

Delta time at 30 fps = 1/30 = 0.033 milliseconds

Updating soon, example will be provided

Swipe Controls: Vector Math

Today I’ll be discussing how I implemented mouse/keyboard Swipe Controls using an interface for varying behavior around the entire project.

ISwipeable

Why an interface?

While improving on my current Network project I ran into a problem where I found myself re-implementing the logic behind swipe gestures to work with different systems such as User Interface, Gameplay and etc; moreover, implementing an interface and more object oriented behavior saved me a lot of typing.

Commands

The TakeAction() functions which are currently being implemented in my Entity class provides customization behavior to any child of the Entity base class. If you haven’t noticed the TakeAction() functions are abstract, meaning that they must be overridden by the implementing child class, making that class a Concrete class.

Override

The Player class inherits from Entity, making it a Concrete class. Any other Object that implements the Entity class can take advantage of the TakeAction() function and create some unique behavior specific to that class.

Vector Math

Swipe

Doing Swipe controls isn’t difficult if your familiar with Vector Math, but if not I’ll do my best to explain.

First step of this process is to grab two 2D positions, in the example above I do so for both Mobile and Editor development in the Swipe() method but we’ll focus on the Editor side. We need these two points in order to create a Vector, and that Vector will represent a direction.

Vector

Next we must normalize this Vector, doing so will maintain the direction and give us a length of 1(norm). Next we pass it to our ReadSwipe() Method.

ReadSwipe

Now by simply analyzing the X and Y information of the vector, we can determine whether it is a left, right, up or down vector.

Interfaces in C#

What is an Interface?
Interfaces are described by Unity as a Contract on Functionality. Classes using an interface have all of it’s methods and properties, which can be overridden using Polymorphic behavior. Interfaces are NOT classes, and cannot be instantiated.

Interfaces

Unlike classes which have an Is-A relation when class B inherits from class A, interfaces use an Implements relationship whereas one class implements an interface, which can be seen in the image above.

Why use an Interface?
Often when using Object Oriented programming techniques in C# or Java, you come to realize that they do not support Multiple Inheritance. Which creates this problem where you often find yourself creating the same method for classes that are unrelated, which is a problem that interfaces are primarily used to solve.

Implementing an Interface
Ifaces001

In the example above I created a script which stores all of my interfaces as it is not necessary to create numerous scripts in order to define multiple interfaces, a single script housing all your future interfaces will do.

There are a couple things your going to need to know in order to define an interface.
     1. Interfaces cannot be declared private.
     2. Variables cannot be declared in the body of an interface.
     3. Any class using an interface must implement all of its members.

References
Image taken from: https://www.youtube.com/watch?v=sQfS4w0wvcc

uNet

During this post I’ll be diving into Unity Networking(uNet) based on my personal experience with it.

What is uNet
uNet is the Unity client/server architecture solution to networking, which handles a lot of the “lower level” networking implementations, giving the developer a bit of a head start.

Network Manager
The NetworkManager which Unity describes as, “a convenience class for the HLAPLI for managing networking systems” is uNet’s point of entry.  It allows you to host/join a game. The NetworkManager handles a lot of information, sections such as the [Network Info] handles more low level network setup such as IP setup, socket binding and etc; moreover, The [Spawn Info] section requires a Player Prefab which is then be spawned at a position either randomly or with a round robin method.

NManager

Update coming soon, stay tuned.